User Manual
Welcome to RenderWorkshop! This is a distributed rendering system designed specifically for Blender. It allows you to connect multiple computers to jointly complete heavy image or animation rendering tasks, saving you a significant amount of time.
This tutorial is divided into a "Quick Start Guide" (for general users) and an "Advanced Configuration Guide" (for professional/advanced users).
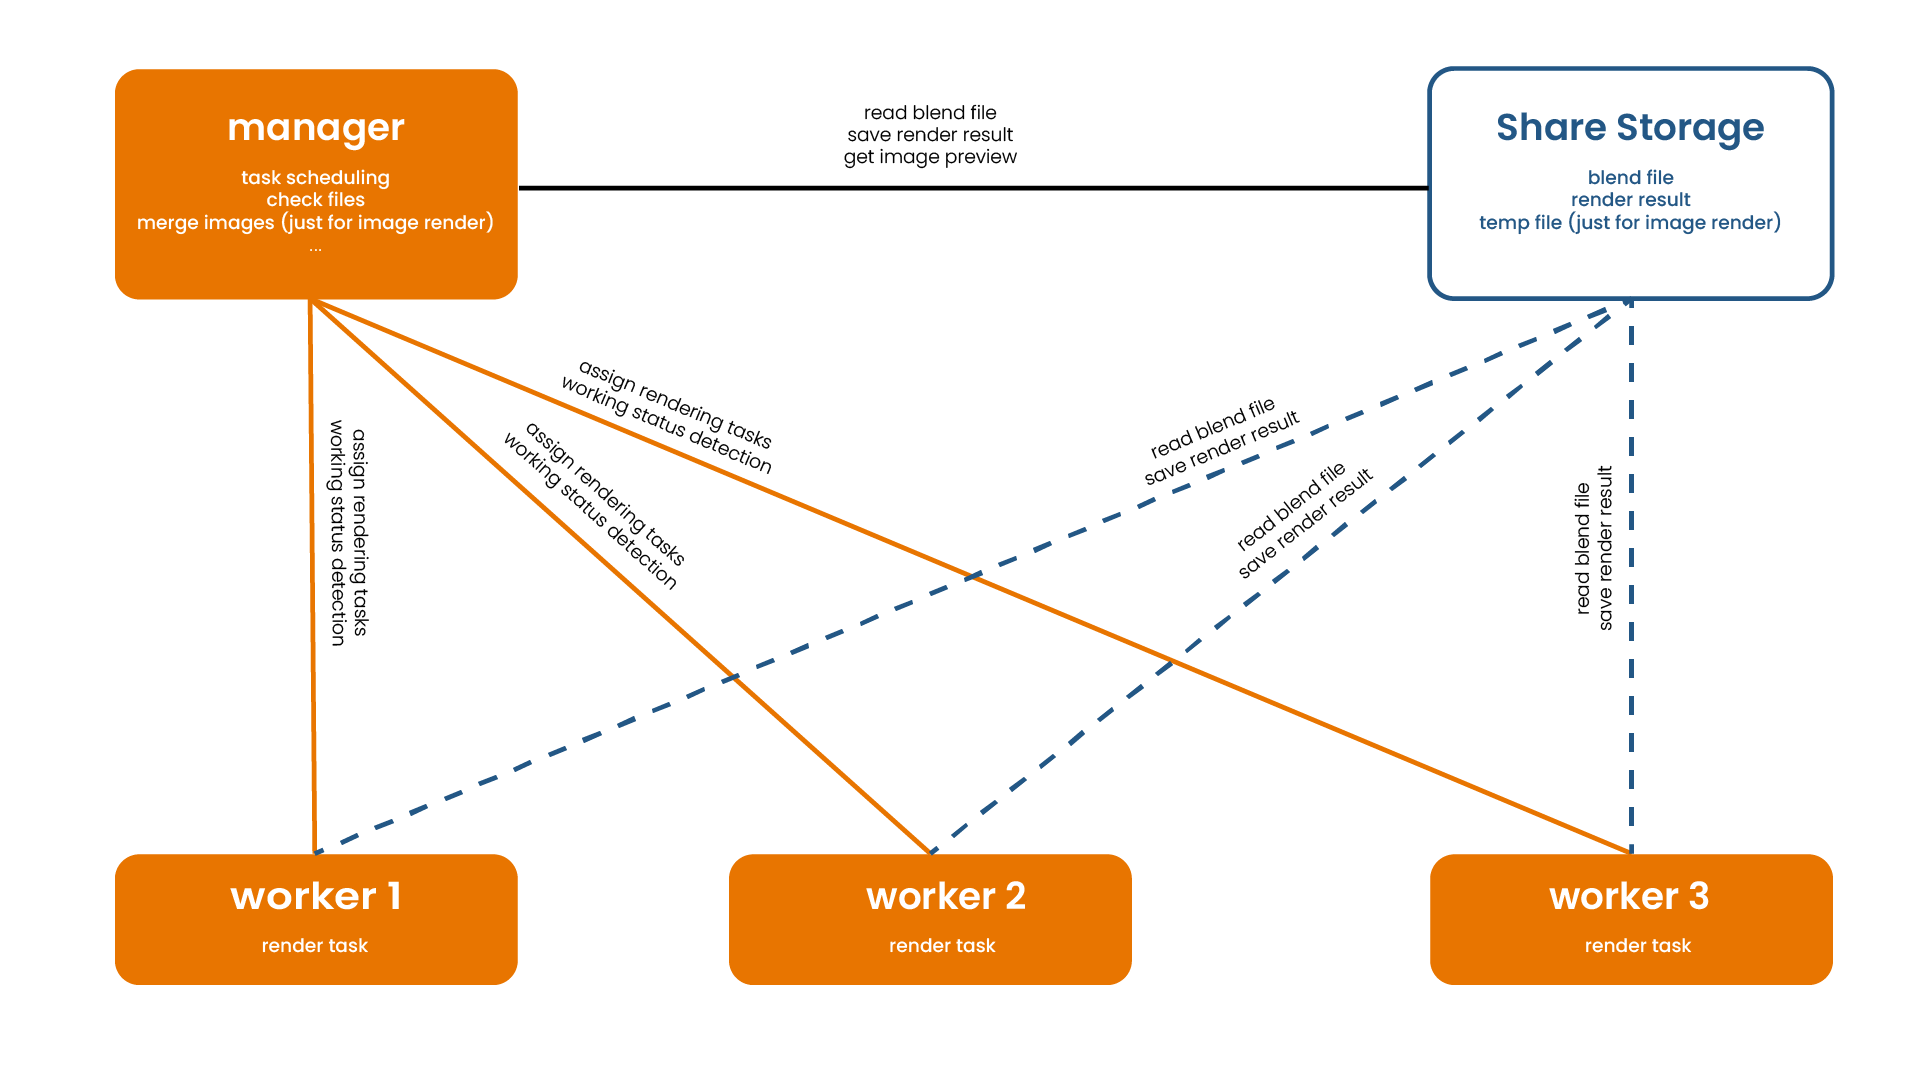 (Figure: RenderWorkshop Architecture System)
Quick Start Guide (For General Users)
With just four simple stages, you can get multiple computers working for you simultaneously!
Stage 1: Preparation
- Shared Storage Space: Ensure you have a shared folder accessible by all computers over the network (e.g.,
//192.168.0.10/render). - Computer Settings: Please set all participating computers to not sleep to prevent rendering interruptions.
- Blender Installation: Ensure all computers have the same version of Blender installed.
- Blender File Preparation:
- Open your project in Blender, click
File -> External Data -> Pack Resourcesfrom the top menu (to pack all materials and textures into the file). - Save this
.blendfile into the shared storage space you just prepared.
- Open your project in Blender, click
Stage 2: Configure the Manager
The Manager is the computer used to assign tasks. We need to start its server first.
- Install the Manager plugin in your Blender and enable it.
- Open the
.blendfile you just saved from the shared storage space. - Press
Nin the Blender interface and find RenderWorkshop in the right panel. - In the Start/Stop Manager Server section, click the Start Server button. (If prompted for network access permissions by the system, please allow it)
Stage 3: Configure the Worker
Workers are the computers that actually do the rendering. It is recommended to use more powerful machines for this.
- Download and Extract: Choose and download the corresponding version of the Worker compressed file based on this computer's operating system and architecture, and extract it to run.
Note: Due to compatibility issues with some computer terminals causing display abnormalities, please manually resize the window to display the interface normally.
- Initial Setup: On the first launch, the RenderWorkshop Settings interface will appear. In most cases, you only need to ensure the Blender Path is correct. Press
Control + Sto save the settings, and then pressEscto quit. - Connect to Server: Restart the Worker program. The Worker will automatically discover and connect to the Manager on the local network within the default UPnP Discovery Seconds (usually 10s).
Important: If the interface consistently shows
Wait for connecting..., it means it has not connected to the Manager (it does not mean it's ready to take tasks). If it times out without connecting, please manually configure the Manager's IP and port in the settings, or try restarting the server on the Manager side (Stop Server, then Start Server). (Note: Some routers may disable UPnP discovery for security reasons. In this case, you need to manually enter the IP to connect or disable this security option in your router settings.)
Stage 4: Start Rendering!
- Go back to the Manager computer. If successfully connected within the LAN, the Worker will automatically appear in the list below, displaying
Check passed. - Refresh Scene: Click the Refresh button. The system will read the scene and camera settings from your file. Please note: Whenever there is any change in your scene, you must click this button to refresh.
- Choose between the Image or Animation pages according to your needs.
- Click the Start Render Image or Start Render Animation button at the bottom to start rendering! You can view the real-time rendering progress in the Render Message list.
Advanced Configuration Guide (For Professional/Advanced Users)
To meet the needs of complex projects and varied network environments, RenderWorkshop provides rich custom parameters.
1. Worker Advanced Parameters (Worker Settings)
In the Worker's setting interface, you can perform the following professional tweaks:
- Network Interface: If the computer has multiple network cards, it may cause connection failures. Please select the correct network interface here to get the correct IP.
- Automatic Startup: If you need the Worker program to start automatically on boot, please run the Worker as an administrator and enable this option in the settings.
- Pull BlendFile: When enabled, the Worker will pull the
.blendfile from the shared network to local storage for rendering. This can significantly improve reading speeds when network bandwidth is insufficient. - Cycles Render Both: For the Cycles engine only. When enabled, the system will simultaneously use both the CPU and GPU for hybrid rendering.
- CommandLine Mode: Enable this mode to run the Worker in the background without a graphical interface, saving system resources for the rendering process.
- Check Code: Security check code. In a multi-user environment sharing the same LAN, setting the same Check Code on both the Manager and Worker prevents accidental connections from others.
- UPnP Discovery Seconds: The duration to automatically search for the Manager's broadcast (it will stop searching after it times out).
- Retry Interval Seconds: The interval frequency to attempt reconnection to the Manager after a disconnection.
2. Manager Advanced Parameters (Manager Panel)
A. Hardware and Thread Scheduling
In the Worker list, click the arrow on the right side of the Worker to expand the parameter settings for that node:
You can manually assign specific Cycles Devices or GPU backend, and limit the number of rendering Threads it uses.
Note: These settings can only be modified when the status is not
Check passed. After setting, you need to click the Check button on the left side of the Worker to re-verify.
B. Image Distributed Rendering Strategy (Image)
For ultra-high resolution single images:
- Tiles: Divide the image into blocks. For example, setting it to
4divides the single image into 4x4=16 blocks, distributes them to multiple machines for rendering, and seamlessly merges them. - Samples and Sample Subset: (⚠️ Only supports Blender 4.4.0+ and the Cycles engine) Uses sample rate splitting algorithms. Multiple machines render different sample intervals respectively, which are finally merged and denoised into a perfect image.
C. Animation Distributed Rendering Strategy (Animation)
- FrameSplit: Split the animation sequence into multiple task packages (e.g., 15 frames per package) and send them to different Workers. Avoid setting this value too small, otherwise frequent task handovers will increase extra time consumption.
D. Scene and Pass Precise Control
Click the expand button on the right side of the scene list to enable Display extra:
- You can assign different View Layers or an Active Camera for a specific Scene.
- Custom Scene: Click the triangle arrow to expand below the scene list, select the corresponding scene, and then click the Add button to add a custom scene. This allows you to batch create rendering queues with different parameters in the same project.
E. Task Quality Control and File Management
To ensure rendering stability, RenderWorkshop has a complete quality control mechanism:
- Pre-render Check: The system checks if the file location is accessible and ensures all computers are reading the exact same
.blendfile (via MD5 checksum validation). - Heartbeat Detection: Continuous heartbeat detection is performed on the Worker during rendering to prevent tasks from stalling if a Worker drops offline.
- Check and re-render missing frames: After rendering is complete, it automatically scans and re-renders any missing frames or blocks.
- Custom Output Path: Specify a custom export path. Note: The custom export paths for both the Manager and Worker must point to the same directory, and all nodes must have read and write permissions for this folder.
Troubleshooting
If you see an error prompt in the Worker list, please refer to the following checklist:
| Error Prompt (UI Info) | Meaning & Explanation | Solution |
|---|---|---|
can't get blend file get local blend file error |
Worker cannot read the project file | 1. Check if the .blend file is placed in a shared folder accessible by all computers, and that all computers have read/write permissions to it.2. Check if the file path contains illegal characters. |
please save the blend file |
File is not saved in the shared space | Please make sure to save your .blend file into the network shared folder, not a local folder. |
does not obtain the same file flag file MD5 does not match |
File consistency check failed | The Manager and Worker are not reading the same file. Please ensure both point to the identical absolute path. |
check code does not match |
Check code mismatch | If you set a Check Code, ensure the characters entered in both the Manager and Worker match exactly. |
output path does not match or flag file losed |
Output path mismatch or flag file lost | There are permission issues with the Custom Output Path. Check if all nodes have read/write permissions to this folder, or try restarting the Server to rebuild the flag file. |
check timeout / went offline |
Node disconnected or heartbeat detection timeout | Check the network connection of the Worker computer, or whether it disconnected due to sleep/hibernation. |
A distributed rendering system meticulously designed specifically for Blender
Other Opus